Welcome to The Ultimate Guide to Spatchcocking a Turkey on the Grill! As the holiday season approaches, thoughts turn to festive gatherings and, of course, Thanksgiving & Christmas dinner. While the traditional roast turkey remains a timeless classic, an innovative approach is gaining popularity among culinary enthusiasts – spatchcocking and grilling a turkey.
Spatchcocking, a technique that involves removing the backbone and flattening the turkey, offers a multitude of advantages over traditional roasting methods. Not only does it impart a smoky, grilled flavor, but it also ensures even cooking, resulting in juicy, succulent meat that’s cooked to perfection in a fraction of the time.
In this comprehensive guide, we’ll delve into the world of spatchcocked grilled turkey, providing you with the knowledge and techniques to elevate your Thanksgiving feast. We’ll explore the benefits of spatchcocking, discuss turkey food safety, guide you through the spatchcocking process, and offer expert tips for grilling your turkey to perfection.
Why Choose Spatchcocking?
The decision to spatchcock a turkey instead of roasting it may seem like a simple change, but it yields a world of difference in the final result. Let’s explore the key benefits of spatchcocking:
Flavor Benefits: Grilling imparts a unique smoky flavor to the turkey, infusing the meat with a depth of taste that traditional roasting methods can’t match.
Faster Cooking Time: By flattening the turkey, spatchcocking reduces the cooking time significantly. This means you can enjoy a perfectly cooked Thanksgiving feast without spending hours in the kitchen.
Uniform Cooking: With the turkey laid flat, all parts of the bird cook evenly, eliminating the risk of dry or overcooked areas. The breast and dark meat cook at the same rate, ensuring a consistently juicy and flavorful meal.
How to Choose a Turkey for Spatchcocking?
When choosing a turkey, there are a few factors to consider:
1. Size: A turkey that is too large for your grill will not cook evenly. A good rule of thumb is to choose a turkey that is no more than 15 pounds for a gas grill and no more than 12 pounds for a charcoal grill.
2. Freshness: Always choose a fresh turkey that has been properly refrigerated. Look for a turkey that has a bright, clean skin and no signs of mold or off-odors.
3. Grade: There are three grades of turkeys available: Grade A, Grade B, and Grade C. Grade A turkeys are the best quality and are typically used in restaurants. Grade B turkeys are a good value for home cooks, and Grade C turkeys are the least expensive option.
4. Price: Turkey prices can vary depending on the size, grade, and time of year. Be sure to compare prices at different stores before making your purchase.
5. Flavor: Turkeys are typically raised on a diet of corn or a combination of corn and soy. Some turkeys may also be antibiotic-free or raised without hormones. If you are concerned about the flavor of the turkey, you can choose a turkey that is raised with a certain type of feed or that is antibiotic-free or hormone-free.
Here are some additional tips for choosing a turkey for spatchcocking:
- Buy your turkey the day before you plan to cook it if possible.
- Allow the turkey to come to room temperature before cooking for about 30 minutes.
- Pat the turkey dry with paper towels before spatchcocking.
- Season the turkey generously with salt and pepper.

Should I Brine my Turkey? The Pros and Cons of Brining a Turkey
Brining is a popular method for cooking turkeys. It involves soaking the turkey in a saltwater solution for several hours before cooking. Brining can help to make the turkey more flavorful and juicy.
Here are the pros of brining a turkey:
- Brining can help to make the turkey more flavorful.
- Brining can help to keep the turkey from drying out.
- Brining can help to add moisture to the turkey.
Here are the cons of brining a turkey:
- Brining can add salt to the turkey, which may not be desirable for some people.
- Brining can take time, as the turkey needs to soak in the saltwater solution for several hours.
- Brining can be messy, as the turkey will need to be submerged in a large container of saltwater.
Here are some additional tips for brining a turkey:
- Use a brine that is made with kosher salt, as it will dissolve more easily.
- Do not brine the turkey for more than 24 hours, or it will become mushy.
- Pat the turkey dry with paper towels before cooking.
- Season the turkey generously with salt and pepper.
Ultimately, the decision of whether or not to brine a turkey is a personal one. If you are looking for a flavorful and juicy turkey, brining is a great option. However, if you are concerned about the amount of salt or the amount of time required, then you may want to skip the brine.
Turkey Food Thawing Safety
Before we embark on the spatchcocking and grilling adventure, it’s crucial to ensure proper food safety practices. Thawing a turkey can be a lengthy process, so it’s essential to plan ahead and use safe thawing methods to prevent foodborne illnesses.
Proper Thawing Techniques:
Refrigerator Thawing: This traditional method involves thawing the turkey in the refrigerator. Allow 24 hours of thawing time for every 4-5 pounds of turkey.
Thawing Times:
Small Turkey (10-12 pounds): 2-3 days in the refrigerator
Medium Turkey (12-14 pounds): 3-4 days in the refrigerator
Large Turkey (14-18 pounds): 4-5 days in the refrigerator
The Boss Defrost Method (Use Promo Code AS10): Place the turkey in a leak-proof bag and submerge it in cold water in a sink or a large food-safe container. Use a Boss Defrost to circulate the water for safe and quick defrosting (click here for more info and how to use The Boss Defrost). Thawing time varies based on the size of the turkey.
Avoid Thawing at Room Temperature or in Hot Water: These methods can quickly increase the turkey’s temperature, promoting bacterial growth and increasing the risk of foodborne illness.
Regardless of the thawing method, ensure the turkey is fully thawed before proceeding with spatchcocking and grilling.
It’s Time to Spatchcock Your Turkey
Now comes the exciting part – spatchcocking your turkey! This technique may seem daunting, but with the right guidance, it’s a straightforward process that anyone can master.
Tools You’ll Need:
Sharp kitchen shears or poultry shears
Heavy-duty cutting board
Paper towels
Step-by-Step Guide:
- Remove the turkey from its packaging and pat it dry with paper towels.
- Place the turkey breast-side up on a clean cutting board.
- Using sharp kitchen shears or poultry shears, cut along both sides of the backbone, starting from the neck and working your way towards the tail.
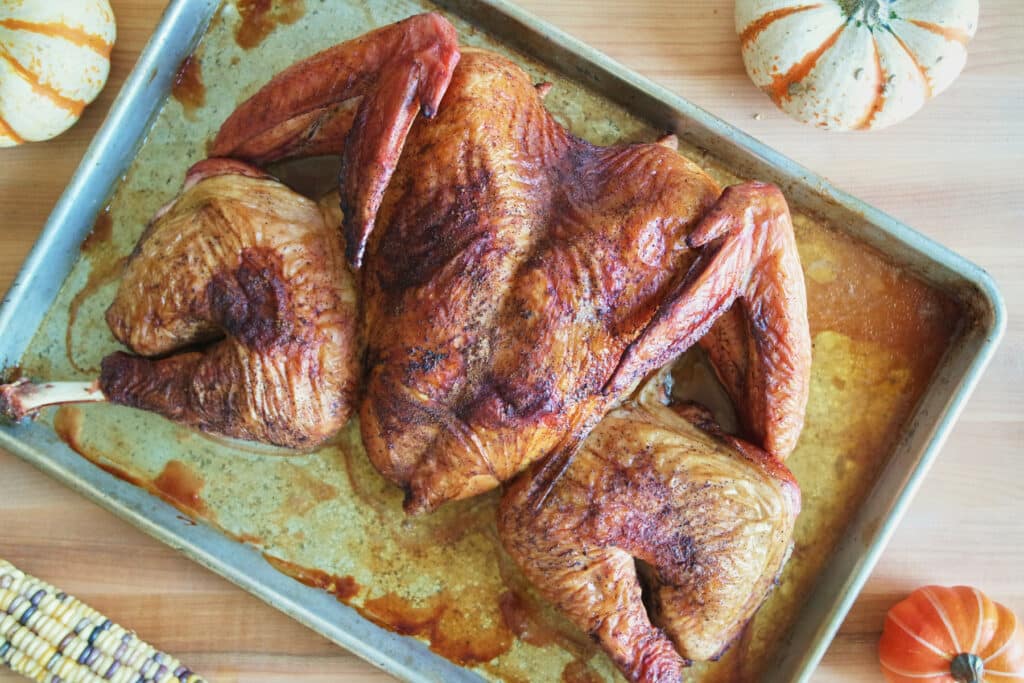
- Once the backbone is removed, flip the turkey over and press down firmly on the breastplate to flatten the bird.
- Trim off any excess skin or fat, and you’re done spatchcocking!
Safety Tips:
- Wear clean rubber gloves to prevent cross-contamination.
- Use sharp shears to avoid ragged cuts and potential injury.
- Work on a stable surface to prevent the turkey from slipping.
Now That We Have a Spatchocked Turkey, How and Where Do I Cook It?
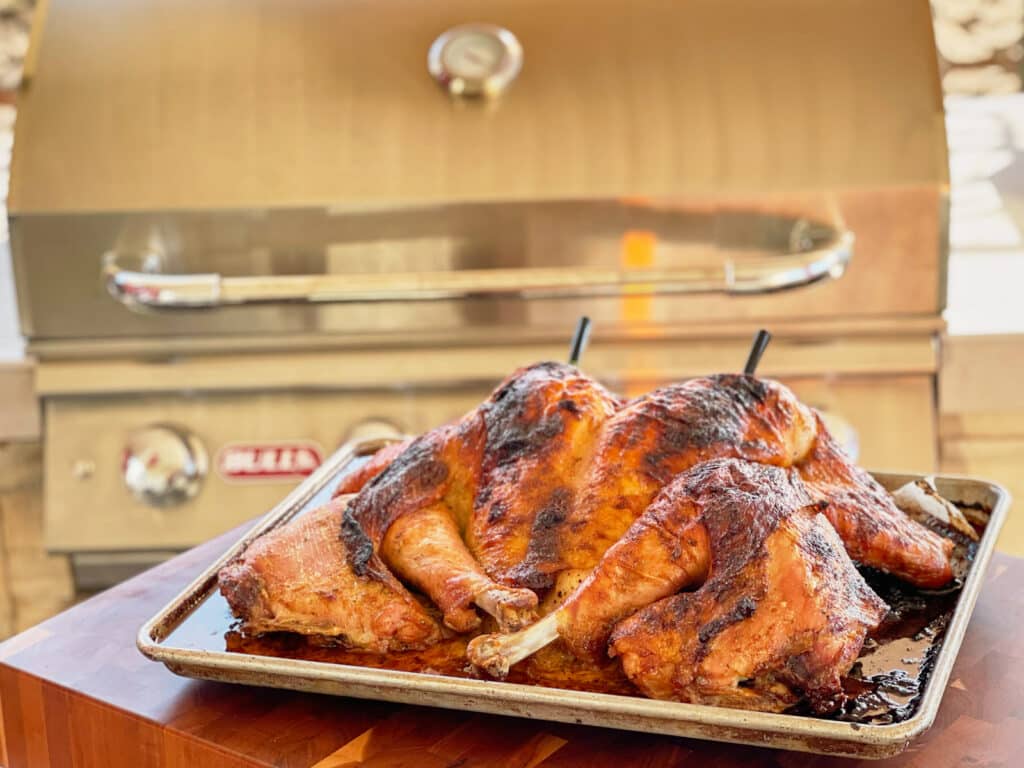
The short answer is: I grill my spatchcock turkey on my Bull Gas Grill using indirect heat. Grilling my turkey outside rather than in my oven also keeps my home cooler and my oven free to bake pumpkin pie!
Indirect Heat: A Symphony of Flavor and Evenness
While ovens undoubtedly deliver consistent heat and a well-cooked turkey, they often fall short in terms of flavor and texture. Indirect grilling, a technique that utilizes the grill as an oven, emerges as a superior choice for spatchcocked turkeys. By creating a two-zone heating system, indirect grilling allows for even cooking while imparting a smoky, grilled flavor that traditional roasting methods can’t match.
The Science Behind Indirect Heat: A Dance of Temperature and Convection
Indirect grilling relies on the principle of convection, where heated air circulates around the food, ensuring even cooking and preventing the scorching heat that can lead to dry, overcooked meat. To achieve this, the grill is divided into two zones: the hot zone, where the coals or burners are concentrated, and the cool zone, where the turkey rests. By placing the turkey in the cool zone, it is gently cooked by the convection of the heated air, preventing direct contact with intense heat that can cause charring and dryness.
The Flavor Advantage: Smoke Infusion for a Culinary Delight
Grilling introduces a dimension of flavor that ovens simply cannot replicate. As the turkey cooks indirectly, it absorbs the smoky essence of the grill, imparting a depth of flavor that elevates the culinary experience. The gentle heat and consistent air circulation ensure that the smoke penetrates the meat evenly, infusing every bite with a symphony of smoky goodness.
The Art of Timing: A Dance with Patience
Indirect grilling requires a bit more patience than oven roasting, but the reward is well worth the wait. Spatchcocked turkeys cook significantly faster than their whole counterparts, but indirect grilling still takes time to achieve the perfect level of doneness. The key is to monitor the internal temperature of the turkey, ensuring it reaches 165°F (74°C) in the thickest part of the thigh.
The Finishing Touches: Basting and Resting for Culinary Excellence
Even the most expertly grilled turkey benefits from a final touch of care. Basting the turkey with its own juices during the cooking process helps to maintain moisture and add another layer of flavor. Once cooked, resist the urge to carve immediately. Allow the turkey to rest for 10-15 minutes, allowing the juices to redistribute throughout the meat, resulting in a more tender and flavorful experience.
The Verdict: A Culinary Triumph
Grilling a spatchcocked turkey using indirect heat is a culinary adventure that yields a juicier and more flavorful turkey than its oven-roasted counterpart. The smoky essence imparted by the grill elevates the taste, while the indirect heat ensures even cooking and prevents dryness. Embrace the thrill of the grill and discover a new dimension of Thanksgiving culinary excellence.

Herb Compound Butter-Infused Spatchcocked Turkey on the Grill
Equipment
- Gas Grill
- Spatchcocked turkey (12-14 pounds)
- Meat thermometer
- Large aluminum foil pan
- Aluminum foil
- Tongs
- Basting brush
Ingredients
- For the Herb Compound Butter:
- 1 cup 2 stick unsalted butter, softened
- 1 cup Mayo
- 1/4 cup chopped fresh parsley
- 1/4 cup chopped fresh thyme
- 2 tablespoons chopped fresh sage
- 1 tablespoon grated lemon zest
- 1 teaspoon salt
- 1/2 teaspoon black pepper
- For the Turkey:
- 1 spatchcocked turkey 12-14 pounds
- 1 onion quartered
- 2 carrots quartered
- 2 celery stalks quartered
- 1 head of garlic halved
- 1 cup chicken broth
Instructions
- Herb Compound Butter Preparation:
- In a small bowl, combine the softened butter, mayo, parsley, thyme, sage, lemon zest, salt, and pepper. Mix thoroughly until a smooth compound butter forms.
- Place the herb compound butter on a sheet of plastic wrap and roll it into a log shape. Refrigerate for at least 30 minutes to allow it to firm up.
- Turkey Preparation:
- Preheat the grill to medium-high.
- Pat the turkey dry with paper towels.
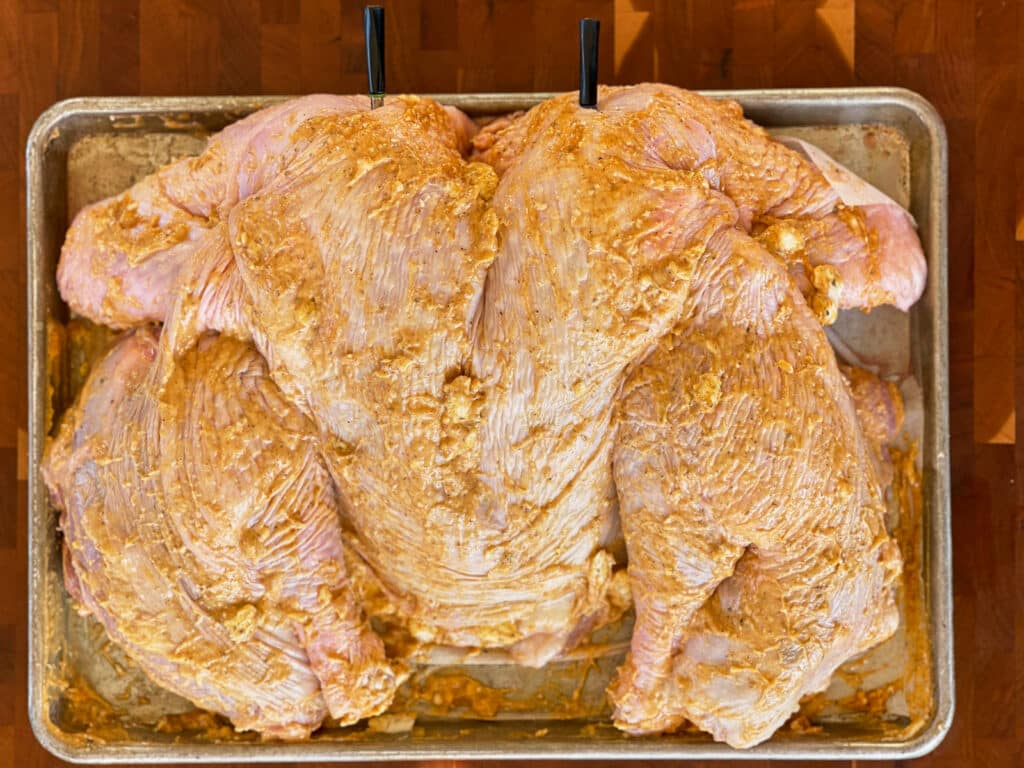
- Generously rub the herb compound butter all over the turkey, ensuring even coverage.
- Place the turkey on a roasting rack that is on a large aluminum sheet pan, and arrange the onion, carrots, celery, and garlic around the turkey.
- Pour the chicken broth into the bottom of the pan, being careful not to overfill it.
- Indirect Grilling Technique:
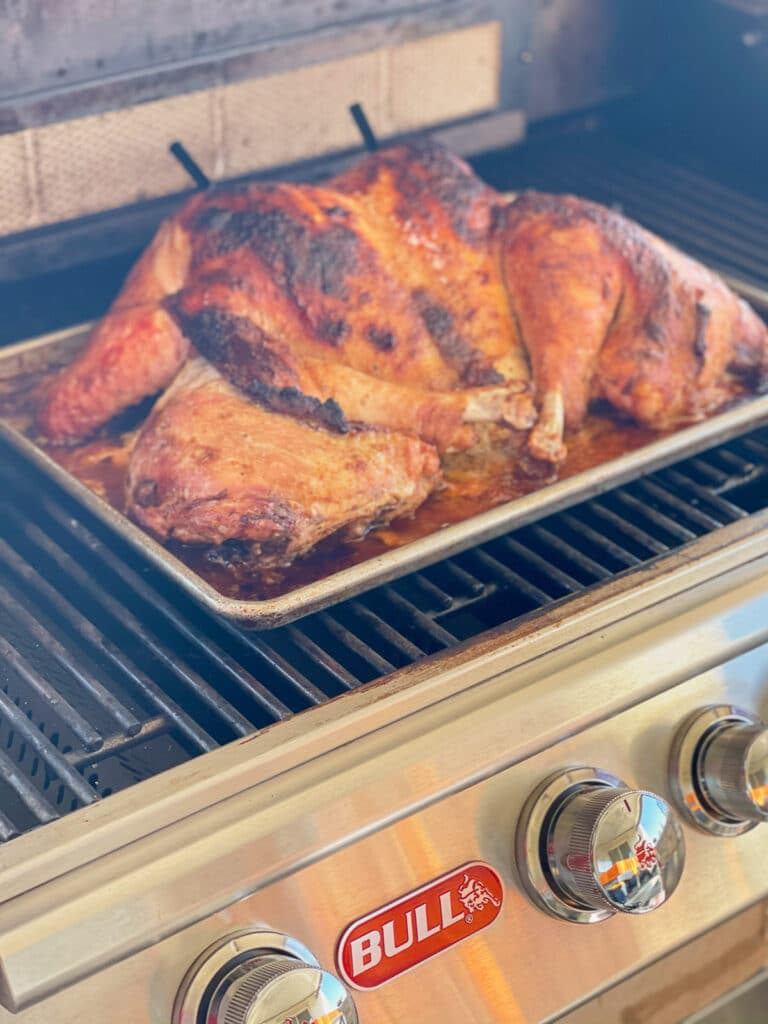
- Set up the grill for indirect heat by turning off the outermost burners. Place the pan on the side of the grill with the off burners. In order to cook the turkey safely, most grills should be able to maintain a temp of 350°F.
- Close the lid of the grill and cook for 1 1/2 to 2 hours, or until the internal temperature of the thickest part of the thigh reaches 150 degrees F.
- Baste the turkey with pan juices every 30 minutes to keep it moist and flavorful.
- Resting and Carving:
- Once the turkey is cooked through, transfer it to a cutting board and let it rest for 10-15 minutes before carving. This allows the juices to redistribute throughout the meat, resulting in a more tender and flavorful turkey.
- Carve the turkey into thin slices and serve with your favorite Thanksgiving sides.
Video
Notes
If the turkey is browning too quickly, you can cover it with aluminum foil.
To ensure the turkey is cooked through, use a wireless meat thermometer to monitor the temperature while cooking. The temperature should reach 150 degrees F.
Allow the turkey to rest for 10-15 minutes before carving. This will allow the juices to redistribute throughout the meat, resulting in a more tender and flavorful turkey.
Enjoy your herb-infused spatchcocked turkey grilled to perfection, and savor the symphony of flavors that will make your Thanksgiving feast truly memorable!